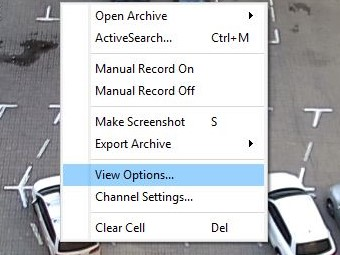
To configure the camera window layout select View options... in the context menu.

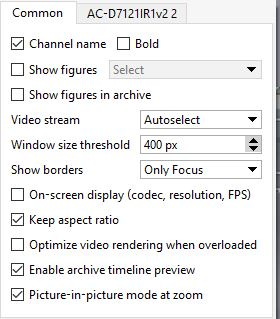
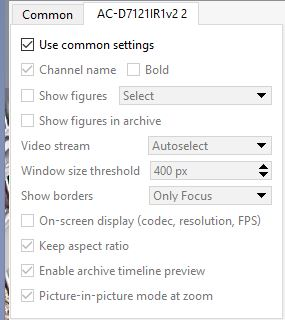
In the opened window you can select from two tabs of the view parameters.


- Common - the selected parameters will be implemented to all cameras.
- [Camera Name] - the selected settings will be implemented to the specific camera.
Tip
On common settings change it must be borne in mind that they will be implemented to those cameras, that have Use common settings box checked. This box is checked in all cameras' settings by default.
- Channel name - click this checkbox to enable displaying of the camera name in the window.
- Bold - this checkbox makes the camera name display in bold type.
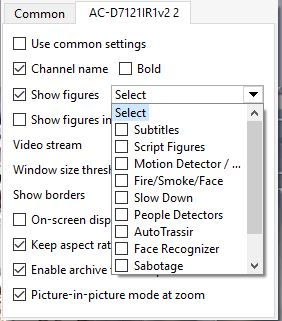
- Show figures - click this checkbox to enable the display of the selected from the dropdown list figures in the camera window. Select one
or several required figures:

- Subtitles - displays the subtitles from ActivePOS. modules on the camera image.
- Script figures - displays script figures, made by the scripts.
- Motion detectors/ SIMT - displays hardware/ software motion detectors zones (if they were set up for the given camera).
- Fire/Smoke/Face - displays fire/smoke and face detector data on the camera image.
- Slow Down -displays slow down detector data.
- People Detectors - displays data from people detectors.
- AutoTRASSIR - displays figures from AutoTRASSIR module.
- Face Recognizer - displays figures from Face Recognizer module.
- Dynamic Heat Map -enables dynamic image of the Motion Heat Map.
Important
The following figures can't be displayed at the same time:
- Motion Detectors / SIMT and any other variant if the channels uses Hardware Motion Detector in the settings.
- Dynamic Heat Map and any other variant.
Selecting Dynamic Heat Map disables all other figures.
- Show figures in archive - click this checkbox to enable the display of the subtitles ( if there any) during archive playback.
- Video stream - select the stream on the screen:
- Autoselect - the displayed stream will be selected automatically, depending on Window size threshold parameter value. If the camera window width is lower than the preset value (400 px by default), the substream (additional video stream of lower resolution) will be used. This value will be ignored if the given camera does not support substream video transfer or it is disabled in the settings.
- Prefer mainstream - always show the main video stream.
- Substream - always show the substream.
- Show borders - click this checkbox to add borders over the camera window, that change their color on event. The following options can
be selected:
- Only Focus - the borders will be switched off and the active window will be highlighted by white angle brackets.
- Focus and motion - in addition to the focus highlighting, the channel will be highlighted by yellow border upon motion detection.
- All borders - all available borders will be shown. They change their color on situation:
- Green - there is no motion.
- Yellow - motion detected in the frame.
- Red - channel record is blocked.
- Blue - Archive review is enabled on the channel.
- On screen display (codec, resolution, FPS) - click this checkbox to enable the display of the applied codec, resolution, bitrate, and FPS in the camera window.
- Keep aspect ratio - this checkbox defines the video scale mode upon the camera window resizing. If this box is checked, the original aspect ratio will be saved. Otherwise, the video will be expanded to all window space (by smaller side).
- Optimize video rendering when overloaded. The system monitors constantly the load capacity of the server mainframe. If the server CPU load is more than 70% for several days, TRASSIR automatically will switch to substream on all channels (except for the channel in focus). In case substream is not supported, TRASSIR will start optimizing the video rendering.
- Enable archive timeline preview enables the display of the Archive Timeline.
- Picture-in-picture mode at zoom - enables the zoomed area display.

