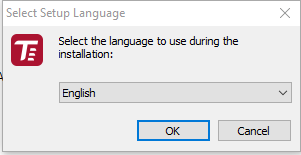
Start the executable TRASSIR Server installation file, select language and press OK.
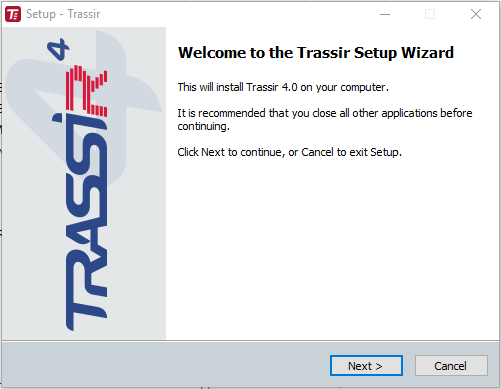
After a language is selected, the TRASSIR installer is started. Click Next.
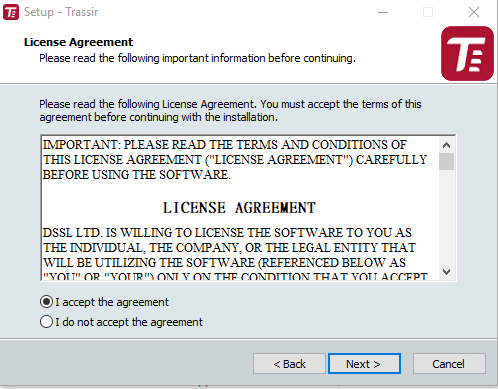
You can review the text of the license agreement on the License agreement screen. After reviewing the agreement, select I accept the agreement and click Next.
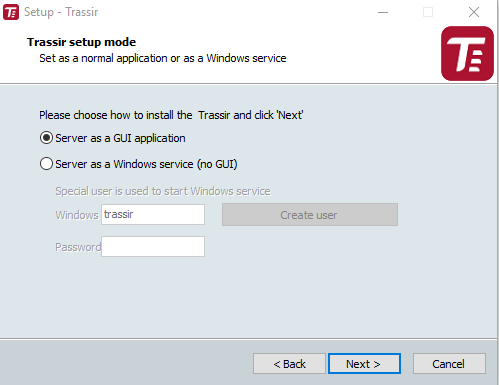
At the next step select the installation option Server as GUI application and press the button Continue.
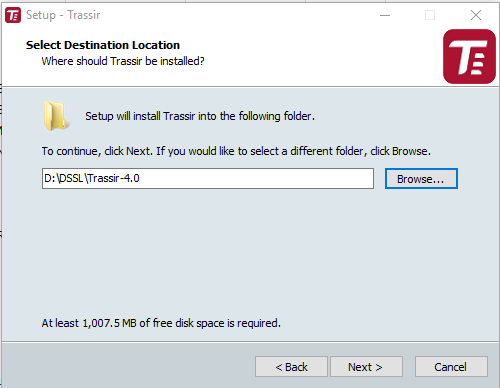
Specify the TRASSIR installation folder by manually entering the path or by using the Browse... button. Click Next.
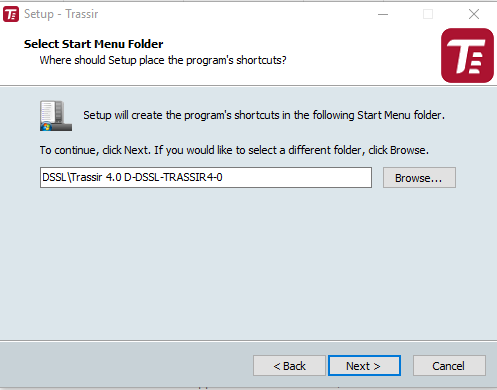
Specify the Start Menu folder where application shortcuts will be created. Click Next.
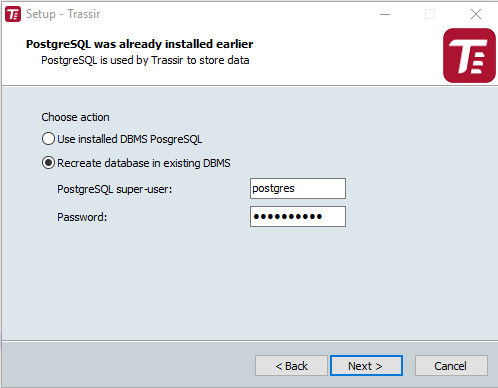
On the next screen, the installer will prompt you to install and configure the PostgreSQL DBMS. All events recorded in TRASSIR will be stored in the database. Although the software can work without connecting to a database, we strongly recommend using one. Moreover, certain modules require a database, i.e. ActivePOS and AutoTRASSIR. Depending on whether the DBMS is installed, the dialog window will look as follows:
-
If a PostgreSQL database is already installed on the computer, the installer will prompt you to use the existing database; if you do not want to use the existing database, select Recreate database in the existing DBMS and enter the PostgreSQL superuser password. Otherwise, select Use installed DMBS PostgreSQL. Click Next.
-
In order to automatically install the database, download the archive of installation files from our website and unpack it in the same folder as the TRASSIR installer. You can also download PostgreSQL from its official website and perform the database installation manually.
Tip
Before beginning to install the database, you must configure the operating system settings.
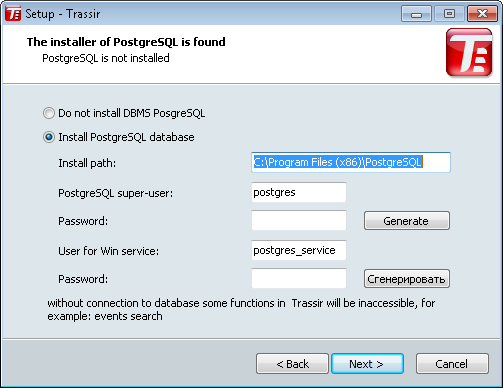
If you have already the database installed or you want to do this later, select Do not install DMBS PostgreSQL. Otherwise select Install PostgreSQL and fill in all the fields. For your convenience, you can use the Generate buttons to generate passwords. After filling out all the fields, click Next. The installation of PostgreSQL will start automatically.
Tip
The PostgreSQL superuser's password can be selectable and you can subsequently create new database users.
The Windows service user's password must satisfy your operating system's security policy. To create a strong password, use the combination of uppercase and lowercase letters, as well as numbers and punctuation marks.
-
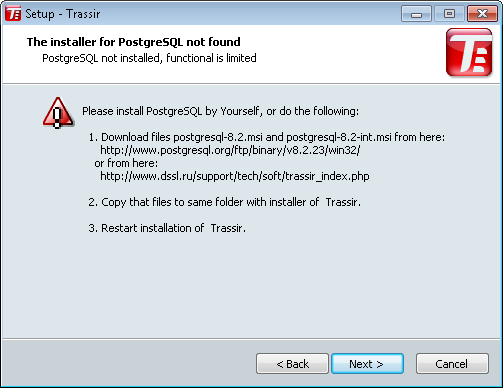
If the installer cannot find the installation files for the DBMS next to the TRASSIR installer and PostgreSQL DBMS is not installed on the computer, the installer will issue a warning. Click Next to skip installation of the DBMS, or verify that the DBMS installation files are in the same folder as the TRASSIR installer and restart the installer.
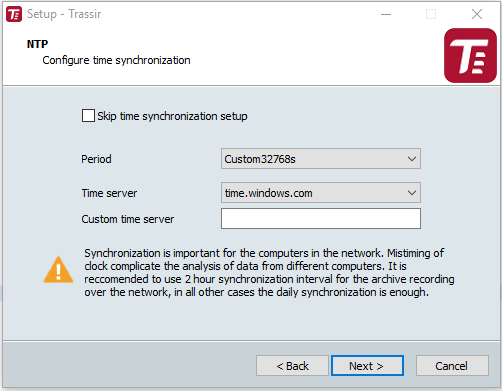
The TRASSIR installer will then prompt you to configure the time synchronization service (NTP). Select a synchronization Period and Time server. If needed, you can specify the address of an arbitrary NTP server or cancel the configuration of NTP by setting the Skip time synchronization setup checkbox. Click Next.
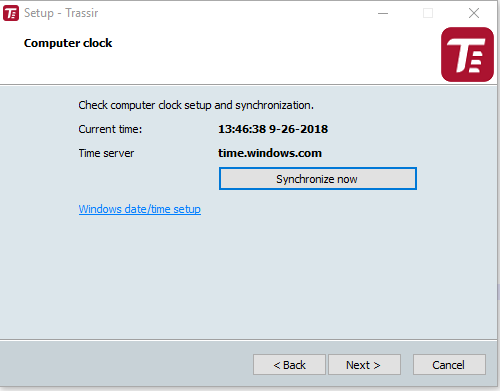
The TRASSIR installer will prompt you to verify the correctness of the server's current date and time. You can synchronize time using an NTP server by clicking the corresponding button or click the Windows date/time setup link to quickly navigate to the settings window. Click Next.
Select any additional installation settings. Click Next.
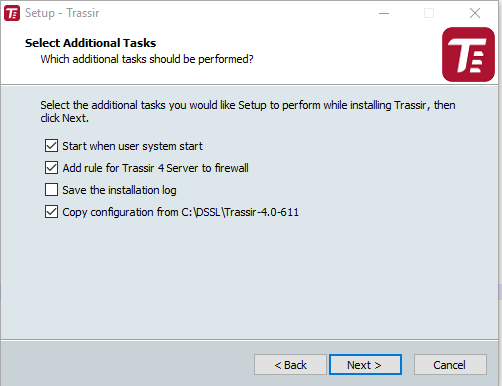
- Start when user system starts lets you restore a system to working order in the event of potential hardware failures, for example, if the electricity supplied to the site is unreliable.
- If you plan to use the standard Windows Firewall, then set the Add rule for TRASSIR 4 Server to firewall checkbox.
- If needed, you can Save the installation log.
- If you are installing to a different folder while updating TRASSIR, then setting the Copy configuration from the previous installation checkbox will copy all the settings from the previous version of TRASSIR. This will save time during the configuration process.
In its final screen, the TRASSIR installer will show the selected installation settings. Click Install.

The files will begin to be copied.
Complete the installation of TRASSIR by clicking Finish.

