After adding a device to the system, you can configure it, e.g. indicate the mode and settings to be used for video recording.
To configure a device, select it in the Settings window.
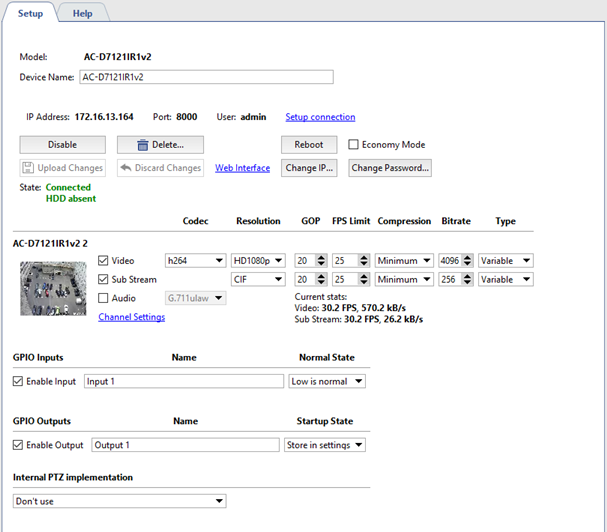
- Model - The device model.
- Device name - The name that will be displayed in the device list. By default, this is the same as the device model.
Connection parameters settings
Devices connected to TRASSIR over a network have a number of other settings:

-
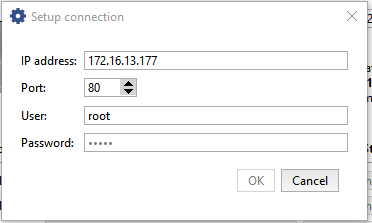
Network connection parameters - IP-address, port and user name. Press Setup Connection to modify parameters.
Tip
Please remember that the user whose data is stored on the device should be entered.
- The Disable button lets you temporarily disconnect a device. All of the device's channels will drop off the channel list. If an archive recording was being made for a channel, it will be added to the list of lost channels. When the device is turned on, all settings made before it was disconnected will be preserved and the previously recorded archive will be available.
- Clicking Delete... will permanently delete the device from the system. The archive for this device's channels will be available in the list of lost channels. If the device is added again, TRASSIR will consider it an entirely new device – all of its previous settings will be lost. If a device is incorrectly or accidentally deleted, you can use the configuration recovery feature, which is described on the main server settings tab.
-
Load Preset. Some devices - IP video recorders made by Lanser, in particular - use preinstalled modes. The Load Preset lets you choose the mode you want from a list.

Warning
For such devices, the settings
ResolutionandFPS Limitmust only be changed using the Load Preset menu. -
Upload Changes and Discard Changes - After making any changes to an IP device's settings, you must confirm the changes by clicking Upload Changes. If there was a mistake, you can restore the device's previous settings using the Discard Changes button.
Tip
If a preinstalled mode is being used (Load Preset), you do not need to click Upload Changes – the settings will be sent to the device automatically.
-
To go to the camera web-interface, click the web-interface link. It will open in external browser.
Tip
In TRASSIR OS camera web-interface will open in internal manual viewer.
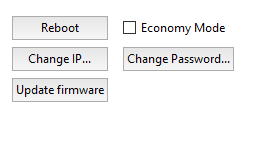
- The Reboot button sends a reboot command to the device (required to apply settings to some devices).
-
Economy mode - This checkbox specifies whether or not the device should use economy mode.
Economy mode is used for slow, unstable, and/or costly transmission channels. Only device events are transmitted in this mode. In economy mode, video from the devices only transmitted on demand.
Tip
Note that not all devices support economy mode. When using economy mode, you must disable recording the archive to the server's disk. To do this, go to the channel settings and in the Recording group, select "Disable" for the Recording to server disks setting.
-
Add virtual channel is used to allot an area of the image into an independent video channel. This function can be used to dewarp video received from Fisheye-camera into several separate channels. See in details in the section Image dewarp into several channels.
-
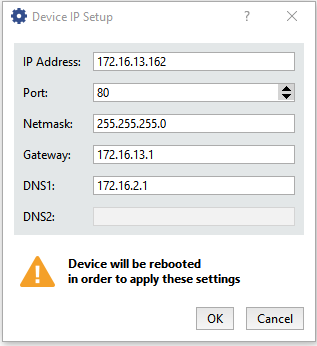
The Change IP... button will open network settings dialog. You can change address, port, subnet mask, default gateway and DNS there.
-
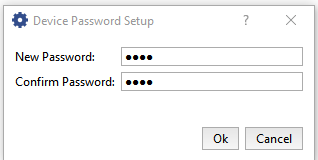
The Change password... button will open camera password change dialog.
Tip
After password change connection to the camera will automatically use new password.
-
Software Update button opens the device software update file selection window.
Tip
This feature is not supported by all the devices.
After the file selection confirmation device status will change to Software update....
In case of successful completion the device will reload.
-
The State: field displays the current state of the connection to the device.
Stream settings
Devices connected to TRASSIR transmit the following data streams:
- Mainstream is a high quality video data used for detailed viewing of video signal originated from the camera. This stream will be recorded to archive.
-
Additional Stream or Substream is the video data of low (comparing to major stream) quality used in the case when it is necessary to display signals from numerous cameras on the screen. In this case high quality of video to display signal from the camera is not required. When transiting from the general scene viewing to detailed viewing of selected scene automatic switchover from additional to the major stream will be done. Substream enables the substantial decrease of load to the server and the network (in case connection to TRASSIR server over the network using TRASSIR client).
- Audio stream is audio data received from device.
Warning
Only certain devices support video data transfer via additional stream.

Left from stream settings picture and name of channel settings of which you are modifying is displayed. Go to Channel settings to access its settings. You can set independent settings for each stream:
- Video - Settings for the main video stream.
- Substream -the additional stream parameters. In case the Substream box is not checked, high quality video will be transmitted in both cases.
- Audio - Settings for the audio stream.
The following settings must be specified for the main stream and substream:
- Codec - The compression codec being used (the setting is the same for both streams).
- Resolution - The frame size (the list of possible values may be different between the main stream and substream).
- GOP (Group of pictures) - The size of a group of frames that contains a single keyframe. The smaller the value, the more keyframes there will be.
- FPS Limit - The maximum number of frames per second.
- Compression - The level of video compression (affects image quality and network traffic). The smaller the compression level, the greater the image quality.
- Bitrate - Data coding. The greater the value is, the better is the image quality and the greater is the network traffic.
- Type - Either a constant or a variable bit rate. If a constant bit rate is chosen, network traffic will be constant and limited by the value of the Bit rate field. Given a variable bit rate, network traffic will depend on the nature of the video stream.
Current stats field displays the number of frames per second and the bitrate of the stream which is recorded to the archive.
Tip
The number of settings available varies depending on the device model. When changing a device's settings, bear in mind its technical capabilities. If you enter settings that are not compatible with the given device model, the State field will display "The settings exceed the device's capabilities".
Alarm input and output settings
If necessary you can define the device to detectors interaction parameters via GPIO inputs and outputs. The availability and the number of available inputs and outputs depend on device model.
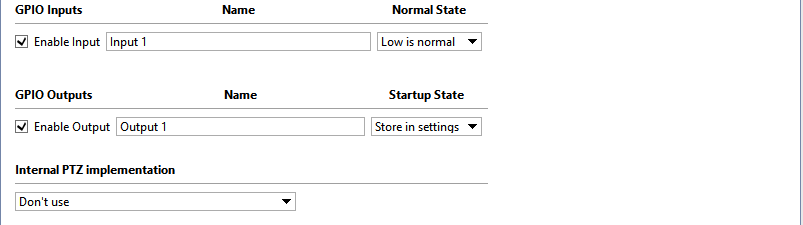
If you're going to use this feature, you must set the checkbox to activate the required device input or output. For convenience, "Name" can be changed to any desired value. Then specify the normal state ("open" or "closed") for inputs and the start-up state for outputs ("off" or "on" or "store in settings").
Tip
To quickly monitor the state of alarm inputs and manage alarm outputs, place them on a map. You can also create a rule or script to be run if the state of alarm input or output changes.
