TRASSIR supports the following IP video servers:
TRASSIR Lanser IP-4P
Rear panel:

Table 2.
|
1 |
1 ... 4 |
Network interfaces to connect IP-cameras |
|
2 |
AUDIO INPUT |
RCA connector - audio input |
|
3 |
AUDIO OUTPUT |
RCA connector - audio output |
|
4 |
VGA MONITOR |
DB15 port for VGA monitor |
|
5 |
HDMI |
HDMI port |
|
6 |
LAN |
Network interface for connecting a video recorder to the local network |
|
7 |
USB |
USB slot for mouse connection (it is used to control the internal interface and flash drive (to reflash the device) |
|
8 |
48V |
Power source 48V DC |
|
9 |
POWER |
Switch to turn device on/off |
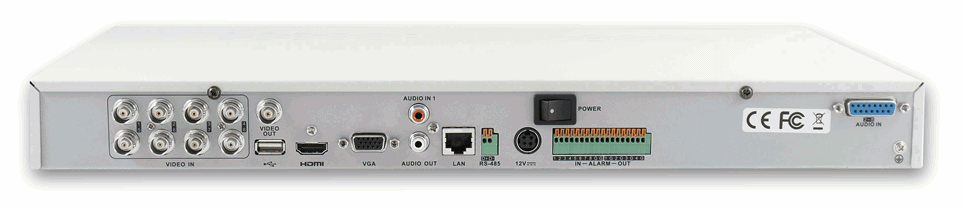
TRASSIR Lanser 960H
TRASSIR Lanser 960H-4 rear panel:

TRASSIR Lanser 960H-8 and TRASSIR Lanser 960H-8 Hybrid rear panel:
TRASSIR Lanser 960H-16 and TRASSIR Lanser 960H-16 Hybrid rear panel:
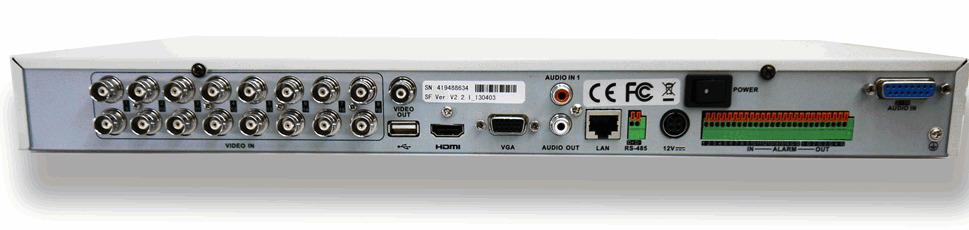
Table 3.
|
1 |
VIDEO IN |
Video signals BNC inputs |
|
2 |
VIDEO OU |
BNC output for analogue monitor |
|
3 |
USB interface |
It is used to connect USB mouse or USB Flash |
|
4 |
HDMI |
HDMI port |
|
5 |
VGA |
DB15 port for VGA monitor |
|
6 |
AUDIO IN |
RCA connector - audio input |
|
7 |
AUDIO OUT |
RCA connector - audio output |
|
8 |
LAN interface |
Network interface |
|
9 |
RS-485 |
Port to connect devices through RS-485 |
|
10 |
12V |
Power source 12V DC |
|
11 |
POWER |
Switch to turn on / off the device |
|
12 |
GND |
Grounding (must be conducted upon video recorder start) |
|
13 |
ALARM IN |
Alarm inputs |
|
14 |
ALARM OUT |
Alarm outputs |
TRASSIR Lanser-Mobile II
Rear panel:
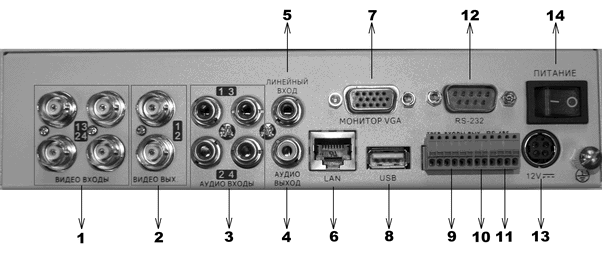
Table 4.
|
1 |
Video inputs |
Video inputs for connecting the cameras |
|
2 |
Video outputs |
Analog video outputs. These outputs are used to connect to an analog video monitor for viewing and configuration. The second output can be used for viewing cameras in SPOT mode. |
|
3 |
Audio inputs |
Audio inputs to connect active (amplified) microphones. |
|
4 |
Audio output |
RCA jack to connect the active speakers or headphones. Used to listen to voice messages. |
|
5 |
Line in |
RCA jack to connect an active (amplified) microphone. Used to broadcast voice messages. |
|
6 |
LAN |
RJ-45 jack to connect a device to a network using TCP/IP. |
|
7 |
VGA monitor |
D-sub socket to connect to a VGA monitor. |
|
8 |
USB |
USB slot to connect a USB mouse (used to control the internal interface). |
|
9 |
Alarm inputs |
Alarm inputs (4 inputs) |
|
10 |
Alarm output |
Alarm output (1 output) |
|
11 |
RS-485 |
RS-485 serial port |
|
12 |
RS-232 |
RS-232 serial port |
|
13 |
12V |
Camera power jack (12 V, current draw of at least 3.33 A) |
|
14 |
Power |
The device's power on/off switch |
TRASSIR Lanser-4Mobile
Back panel:
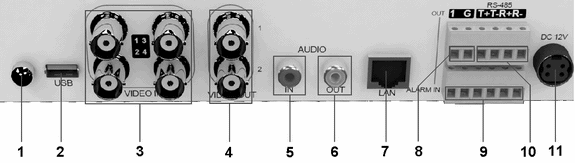
Table 5.
|
1 |
- |
Grounding. |
|
2 |
USB |
Mouse USB slot (is used to control the internal interface and flash drive, which is used for the device reflashing). |
|
3 |
VIN1-VIN4 |
Camera connectors. |
|
4 |
Video output |
Analog video output signal. It is used to connect to an analog video monitor. |
|
6 |
Video SPOT |
Analog video out. It is used to review cameras. |
|
7 |
LAN |
RJ-45 jack to connect to a network using TCP/IP. |
|
8 |
OUT |
Alarm output (1 output). |
|
9 |
IN |
Alarm inputs (4 inputs). |
|
10 |
RS-485 |
RS-485 serial port. Used to control PTZ devices. |
|
11 |
DC 12V |
Camera power jack (12 V, current draw of at least 3.33 A) |
|
12 |
RS-232 |
RS-232 serial port. It is used to configure the TRASSIR Lanser-4Mobile using a computer's serial port. |
TRASSIR Lanser-1Real
Rear panel:
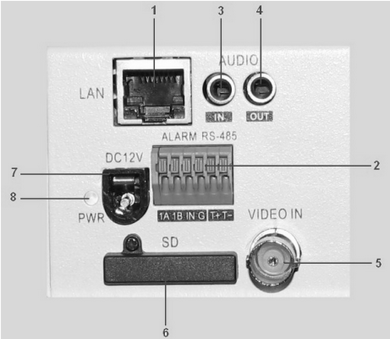
Table 6.
|
1 |
LAN |
RJ-45 jack, used for network connection. |
|
2 |
1A 1B IN G T+ T- |
Alarm output (pins A and B). Alarm input (pins IN and G). Half-duplex RJ-485 serial port (pin T+ and T-). |
|
3 |
IN |
Audio input, used to connect an active (amplified) microphone. |
|
4 |
OUT |
Audio output, used to connect headphones. For high-volume listening, i.e. when connected to speakers or a notification system, and external audio amplifier is required. |
|
5 |
VIN |
Analog video input from the camera. |
|
6 |
SD |
SD-card slot. |
|
7 |
DC12V |
Power supply jack (12 V, current draw of at least 700 mA). |
|
8 |
PWR |
Power-on indicator. |
These instructions will assist in preparing IP-videoserver to connect it to TRASSIR.
Warning
Switch off power supply before performing any activities on the device.
Important
Before connecting any device to IP-videoserver it is strongly recommended getting acquainted with IP-videoserver guidelines and the list of the compatible devices.
Before connecting to IP-videoserver, do the following:
-
Install hard drive into the device and fix it.
-
Connect network cable to RJ-45 (UTP) slot on the device. In case the device is directly connected to computer it is necessary to use cable with crossover crimping scheme.
-
Connect one or several cameras to the relevant ports:
- RJ-45 - for IP-cameras
- BNC - for analogue cameras
-
Connect audio devices to the corresponding RCA-ports on the device.
-
Connect contacts for alarm inputs/outputs operation.
-
Connect RS-485 port contacts for work with PTZ cameras.
-
Fix IP-videoserver steadily and connect power supply.
-
Open WEB-interface of the device and format the hard drive.
-
Set up IP-videoserver using SADP utility software.
After that you'll be able to add the device to TRASSIR.
Tip
Besides the above named devices, TRASSIR will also operate properly with old-fashioned IP-videoservers: Lanser-4M, Lanser-4HDD, Lanser-4Real. Please note that you can not order such devices (for example to expand video surveillance system).
